Design for Contact Form 7 Style WordPress Plugin — CF7 WOW Styler — Плагин для WordPress
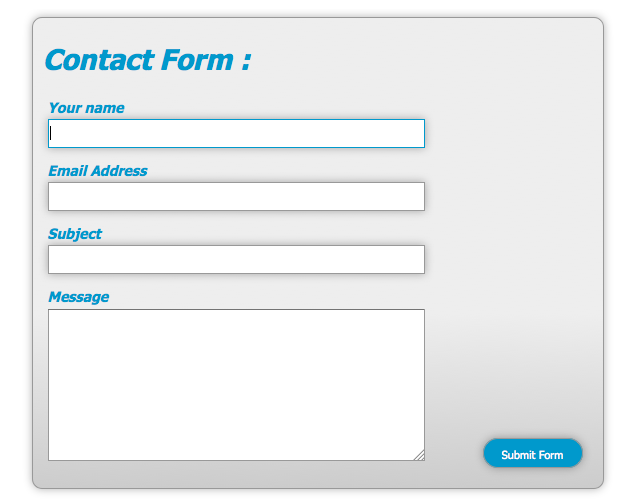
The purpose of this plugin: You can style Contact Form 7 forms, like changing colors, shapes, shadows, backgrounds, … without any knowledge of CSS.
How to add style in contact form 7 to match your design? With the WOW Styler.
Start by using the New Handbook & Knowledge Base!
Please make sure you read the latest changes and benefits from our WP.org changelog to get the most out of the CF7 styling plugin.
This is the story about how to add style in contact form 7 by our new plugin
Melanie and Tobias (me) started using CF7 Forms and we asked ourselves how to add style in contact form 7? We did some research on existing styling contact form 7 wordpress plugins like Contact Form 7 Skins, Contact Form 7 Style. Our main goal was to design a contact form and use this design for other forms, starting from a default template or from the scratch.
What we have seen frustrated us. We thought there must be better ways styling contact forms and thus invented an much easier contact form 7 styler.
This is the beginning of the story about how we got the idea of creating a new plugin to add styles in contact form 7.
How I turned Melanie, an old Contact Form 7 CSS hard coder, into using the WOW Styler for CF7
She said
“why do I have to pay for a plugin license or develop one when you can style everything in the browser and then copy the code into page with the CF7 form?”
And here is why:
- You need a CSS plugin to add contact form 7 css per page and not to style and have all forms look the same style across the whole website.
- And you can not place two forms with different styles in one page/post.
- When it comes to set a background image and align it on the right top angle it needs a bunch of CSS knowledge to do it.
 Do you have it?
 - Styling is getting even harder when you style a form which is inside a page builder as this could stripe out all your own CSS.
 Do you have it?
Now Melanie decided to pay a part for the WOW styler development and now she is using it on all her own and her customers websites.
You like to know how to add style in contact form 7 for FREE?
You can use the free trial version with all features!
OR you do it like Melanie and her customers as they are using the premium version for free, because Styler Premium is free when running on a website with an active WP2LEADS Pro version.
Now you know our story and how to use it for free
LET´S GET STARTED BY DOWNLOADING PLUGIN OR SEARCHING FOR “WOW STYLER” IN YOURS WP PLUGINS SECTION
Vlad (Developer), Melanie (Online Marketer since decades) and Tobias (Plugin Innovator) created an completely new plugin with following features.
Features
- Theme independent styling, changing theme will not reset style
- Wide Themes, page builder and browsers compatibility
- Live preview of your form style during designing it. You can see your themed form and the live form at the same time within the split view
- If your theme provides CF7 styles you can additionally design your form with the styler
- The Contact Form 7 style plugin is under constant improvement and support. Feel free to submit your wishes to us!
- Comes for all forms with beautiful default style scheme (thanks to Vlad)
- WOW Styler you just enable “load in body” to get the style active, especially in page builder/themes that would stripe out your CSS. Therefore, it works with all themes and page builders.
- Style all forms from the scratch or alter the default scheme with a lot of settings (all settings listed below)
 You can see your themed form and the live form at the same time within the split view
FEATURES on LIFETIME PREMIUM OR with ACTIVE WP2LEADS PRO VERSION
Thank you, Melanie, for the idea to style Contact Form 7 for free with active WP2LEADS license:
- Style each form individually and attach style to any form
- Align radio buttons and checkboxes
- Add a different background to each form
- Create as many style schemes in CF7 as needed.
- Load styles in body-tag to show style when CSS is striped out by a page builder/theme. That makes it possible to style CF7 forms in nearly every place.

Quick start ideas how to add style in contact form 7 forms
- Change colors of the default scheme to meet your corporate identity
- Change the background of each form and save it as an different scheme like „default scheme + smiling sun“
- Use the 14 days Pro trial, with all features, with a few clicks, available in plugin, via sub menu.
ADVANTAGES when you STYLE CONTACT FORM 7 with WOW STYLER
- Change the Contact form 7 templates with ease.
- With this CF7 Customizer you can easily create individual designs for your registration form or contact form with just a few clicks.
- The Contact Form 7 styler works across contact form styles coming with your theme. This means you can be sure that the WOW Stylers design really works in all themes and page builders.
- If you would like to have an individual contact form 7 styler that will give you a live preview for contact form 7, then the CF7 skin of this form customizer will inspire you.
- Contact Form 7 style plugin is a contact form customizer that works wonderfully with other contact form 7 add-ons. Perfect collaboration between WordPress form customizer and contact form templates.
- For some reason you may don’t like your current CF7 style anymore, you can easily return it to the standard of your CF7 templates with one click.
- The contact form 7 designer as CF7 customizer fulfills every desire
- Saving your designs in contact form 7 templates saves you a lot of time.
- The immediate feedback saves you time. The live split view makes it intuitive and easy to use.
- If you where searching for beautiful contact form designs but could not find something which you can quickly adapt to your websites styling then maybe you´ll find here what you are looking for. Just alter the default style by changing the colors to fit to your websites cooperate design.
- And with the premium version you can also skin all forms with the same template and you can change only background images per form, to create an eye catcher styled contact form 7 form and just save the new created style scheme with a new name like “default CI + teddy bear background” and you are done.

 Just alter the default style by changing the colors to fit to your websites cooperate design.
Let me summarize it.
If you are looking for an easy way to use Contact Form 7 style plugin, which gives you the freedom to style Contact Form 7, saving your own styles, having a split view which is saving your time and which is always supported by humans instead of machines, you should click now the Download Button
My favorite functionality
When you look at the form in front, you can click on the link to directly start styling the current form in the styler.
73 possible form settings in 12 categories:
2.Form Background Image & Colors
3.
 Form Padding, Margin & Border(Customizable Padding, Margin & Border)
4.Input Fields Text and Colors
5.Input Fields Padding & Margin
6.Checkboxes & Radiobuttons
7.Button Size, Text & Colors(button styling)
8.Button Border & Shadow
9.Custom CSS
10. Style headers
11. Add image to form
12. Contact Form 7 fields two columns
For more just ask us in support forum
For all 73 style settings look in the FAQ section
- How to add Contact Form 7 background images
- Before — unstyled contactform7
- Please rate us — form with styler interface with Contact Form 7 style
- Example how to add style in Contact Form 7 with Sunflower form backgrounds
- GIF what is new with version 1.3.12: Add Contact form 7 image + ration to be mobile responsive, Contact Form 7 fields two columns, change font color of headers and other header styles
Let’s get your forms styled
- Step 1: Install/activate Contact Form 7 style plugin
- Step 2: Go to CF7 Styler which is in the «Contact» sub menu
**Pst. If you like some example forms which are already connected to [Klick Tipp an German E-Mail and SMS Marketing Provider] (https://www.klick-tipp.com/15194) Get WP2LEADS too.
If you are using WP2LEADS with an active Pro Version the Contact Form 7 Styler Premium version is free for you.
Can I test the Pro version for free?
Yes sure, the best things in life you can test for free.
Do a 14 days Pro trial, directly in your WP backend, inside the plugin CF7 styler menuWe love to create and maintain the styler.
The premium version is to say thank you and to ensure this styler endures maintained forever.How can I report a bug or request a feature?
Melanie, Vlad, Tobias requested features and you could do, too.
We are more than happy to customize the plugin to your needs.- Create video (please avoid to show personal or user data) with free screencast software
- Share the video via the support forum or via email support@saleswonder. biz
- You will most times get a solution in one day
Can I earn money with the Contact Form 7 style plugin?
- Yes we have an affiliate program running that pays you 35% lifetime commission.
You find the program inside the plugin submenu under contacts, called «Affiliation». - There is even more, when you write a blog post you will get 12 months pro version and lifetime 35% affiliate earnings through your Affiliation link (example 31 € for selling a lifetime version).
- Here is how to get an affiliate:
Blog post draft for you to use:
Do you know already the WordPress Plugin «WOW Style for Contact form 7»?You can style Contact Form 7 forms, like changing colors, shapes, shadows, backgrounds, buttons, … without any knowledge of CSS.
- Animated tutorial gifs, get faster styled
- Here is the link to the free Plugin https://wordpress.org/plugins/cf7-styler/
- Yes we have an affiliate program running that pays you 35% lifetime commission.
Why is the affiliate program not shown to me?
If you get the premium license via an active WP2LEADS version the link is not shown.
Just deactivate WP2LEADS become an affiliate and activate WP2LEADS again.Show me what can i style with the Wow Styler?
- Form Text
Text Color
Font Size
Font Family
Links Settings Links Color
Links Hover Color
Labels Settings
Labels Color
Labels Font Size
Labels Font Weight
Labels Font Style - Form Background Image & Colors
Background Color
Background Image (Premium)
Upload Image
Image Opacity
Image Size like cover, contain, repeat vertical, repeat horizontal, repeat both
Image Position like up, down, left, right and every corner - Form Padding, Margin & Border
Padding
Margin
Border Width
Border Radius
Border Color
Form Shadow
Horizontal Length
Vertical Length
Blur radius
Spread radius
Shadow Color
Opacity
Shadow Position - Input Fields Text and Colors
Make input fields full width? YES/NO
Font Size
Line Height
Text Color
BG Color
BG Opacity - Input Fields Padding & Margin
Padding
Margin
Border
Radius
Color
Input Shadow
Horizontal Length
Vertical Length
Blur radius
Spread radius
Shadow Color
Opacity
Shadow Position - Checkboxes & Radiobuttons
Make checkbox item one per line YES/NO (Premium)
Make radio button item one per line YES/NO (Premium)
Labels Font Size - Button Size, Text & Colors
Make full width? YES/NO
Padding
Text Color
Hover Text Color
Hover BG Color
Font Size
Line Height - Button Border & Shadow
Button Border
Width
Radius
Color
Hover Color
Button Shadow
Horizontal Length
Vertical Length
Blur radius
Spread radius
Shadow Color
Shadow Opacity
Shadow Position - Custom CSS
clear, preview button - Style headers
- Add image to form
- Contact Form 7 fields two columns
- Form Text
Server Requirements
Minimum PHP memory 64 M better 128 M
Example: When using a lot of memory consuming plugins and you activate styler or any other plugin you could run out of memory.
This is not only happen with CF7 style plugin but also common with other plugins when you have a small PHP memory limit.
Benefits of a higher PHP Memory: When install and activate plugins you not run into white site so fast.On Thrive Architect if you see form not styled
Disabled strike styles, like shown in this video or enable load in (Premium)
How to Video: https://drive.google.com/open?id=1nZKsIZEIdmSYClIldum-2hK03nkv9PvY
You have a better, additional translation? Great 😉
Use https://wordpress.org/plugins/loco-translate/ to generate a .po and .mo file and share files via [email protected] thanks.
How can I get the styler version for free?
If you are using WP2LEADS with an active Pro Version, the Contact Form 7 Styler Premium version is free for you.
 biz
biz

It doesn’t work and it’s all paid
Easy way to style with all important options in the free version, but sadly doesn’t apply to the form.
Thanks for creating this amazing plugin !!!
It looks like this plugin has been abandoned. Even the links on the page no longer work.
Wonderful plugin and perhaps the most responsive customer service I’ve ever experienced. Well worth subscribing to the pro version. In fact, if there were just one plug-in that I’d buy, it would be this. Tobias, the developer, is awesome.
i like styling my cf7 forms now as it is so easy and handsome to do. tried before other skins plugins but this is the best THX to the developer
Посмотреть все 11 отзывов
«Design for Contact Form 7 Style WordPress Plugin — CF7 WOW Styler» — проект с открытым исходным кодом. В развитие плагина внесли свой вклад следующие участники:
Участники
- Saleswonder.biz
- Freemius
Перевести «Design for Contact Form 7 Style WordPress Plugin — CF7 WOW Styler» на ваш язык.
Заинтересованы в разработке?
Посмотрите код, проверьте SVN репозиторий, или подпишитесь на журнал разработки по RSS.
1.4.4 released 2022.09.18
- Fixed: Access to style the form, if you fresh installed the plugin
Thank you Christopher for telling me about the bug - Added: Knowledge base articles: Two columns forms, placeholder color, use theme style, …
Start and improve your forms by using the New Handbook & Knowledge Base articles!
Please on the page select «T» or «NT» user to see the articles.
1.4.3 released 2022.09.11
- Added: Knowledge base & chat/ticket support inside the plugin
- Added: Four knowledge base articles
Start and improve your forms by using the New Handbook & Knowledge Base articles!
Please on the page select «T» or «NT» user to see the articles.
1.4.2 released 2022.02.24
- Security fix: in one of our used libraries
all update please! - More easy license and trial handling.
Benefits: Trial for free is always the best start to have multiple forms each styled different with nice light background images ect.

1.4.1 released 2021.03.09
- Compatible with the latest CF7 and WP Version
- Updated Freemius SDK which handles trial, paid versions and opt-in to exclusive email tutorials
1.4.0 released 2020.12.04
- updated to the latest freemius SDK for more security, privacy and usability
- added menu item ‘Opt-in to see account’ if admin skip opt-in previously
- feel free to request more features
1.3.13 released 2019.08.25
- Checked and WP 5.5 compatible
- Thank you all very much for 1000 active installations
- To thank you please handover your cf7 style needs and we will look what we can do 😉
1.3.12 released 2019.07.27
- updated the tutorial page inside the plugin:
- Tutorial content:
- Simple style
- Complex style
- Style headings
- Add image to form
- Create 2 columns
Your benefits you can do more with your forms.
1.3.11 released 2019.07.21
- Contact form 7 style headings with the WOW Styler
please watch the tutorial video and
use the CSS code, both provided inside the tutorials page in the plugin
1.3.10 released 2019.05.28
- New and short videos and images inside the plugin in the tutorial section
Your benefits easy and fast start
1.3.9 released 2019.04.18
- First step to more functionality
- Updated all translations
1.3.8 released 2019.04.07
- Hand translated french, spanish and polish translation replace the machine translation.
Thank you Marek from translation service http://www.lexpertise.eu/.
For each translation he got an one site lifetime version in exchange. This deal i do with every hand translated main language which is sent to [email protected]. Easy translation with free «loco» translation plugin.
Roadmap: We will add a lot more styling features.
Your benefit would be that you can style any part of the form.We where busy developing the «Better reviews for WooCommerce», we developed for ourself and now released new version for all. https://wordpress.org/plugins/more-better-reviews-for-woocommerce/

1.3.7.2 released 2019.02.06
- Added translations (by Yandex): Portuguese (Brazil), Polish, Spanish (Spain), French (France), Japanese, Russian
Already translated by humans in English (US) and German (all kinds)
Benefits of the translations: You feel more home, can work faster and can use this plugin if you do not unterstand english.You have a better, additional translation? Great 😉
Use https://wordpress.org/plugins/loco-translate/ to generate a .po and .mo file and share files via [email protected]
1.3.7.1 released 2019.01.18
- Added: Buttons to the tutorial and welcome page
Benefits: Faster access to the styler
1.
 3.7 released 2019.01.17
- Added: 3 Animated gifs, to the wp.org screenshots section and to the tutorial page inside the plugin
Benefit: Match the form to your style, add background image, get buttons aligned in seconds - Added: New shorter intro video
Benefit: Get faster how the plugin works - Updated: Plugin name
Benefit: One name allover «WOW Style Contact Form 7» for easy search and handling
1.3.6 released 2019.01.10
2 Fixes and 1 small known issue
Known Pro version issue: When you add a background and label color to a scheme and activate scheme for all forms, your individual styled forms are styled with the colors too.
Workaround: Click «Disable style for all forms» and Activate style one by one per form, until fixed ;-), sorry.Fixed: Change permalink handling to show form if permalink not set up
Benefit: In every permalink setting now the styles previews the form (Thank you Vlad, Brian)Fixed: Link above each form in frontend
Benefit: With more than one form on a page or post you can now click on edit button above each form, for instant editing (Thank you Vlad)
1.
 3.5 released 2019.01.07
Known Bug: Permalink Settings
When «Common Settings» set to «Plain» like «http://domain.com/?p=123»
Results in an 404 in the styler form preview
Workaround: Please choose a different setting to «Plain»
Issue sent to developer
Bug will be fixed.Minimum PHP memory 64 M better 128 M
Example: When using a lot of memory consuming plugins and you activate styler you could run out of memory.
This is not only happen with CF7 style plugin but also common with other plugins.
Task to check memory consumption is on the developers task list.
Benefits of a higher PHP Memory: When install and activate plugins you not run into white site.Welcome and Tutorial video updated
now you see the latest styler version in action
Benefits: See how to style your forms in minutes into an eye catching form with a higher conversion rate.Updated screenshots
Benefits: You see better how to add style in Contact Form 7 with beautiful backgrounds by looking at the beautiful examples.

1.3.4 released 2019.12.28
I am really sorry the admin bar was not shown.
I got aware of it by using the plugin myself.
Now tested and working 😉
* Fix: Show admin bar on frontend
Your benefit: Have your frontend admin bar, to access backend easily, back
So if you running into trouble please contact us and we will solve issue.
Also feature requests are welcome.
1.3.2 — 1.3.3 released 2019.12.19
- Split view also in free version
Your benefit: Always see style changes instantly
Your benefit: Always see live form style - Show duplicated form in second column
Your benefit: Better comparison of design view and live/unstyled view - Reduced menu height on the right side
Your benefit: More space for styling
1.3.1 released 2019.12.17
- Fix: Make switch to scroll or fix inside split mode
1.3 released 2019.12.17
- Added: Split view
Benefit: See live results when styling or saving style. Best for usability.
 Best for usability.
1.2.6 — 1.2.7 released 2019.12.03
- Tip: Opt-in with freemius to get access to extrem long trial period version.
Your benefit is you can test everything for free without entering any payment infos. - Tutorial and welcome page with quick start & quick style video
Your benefit is an easy start with the styler, i had fun doing this video. - Fix an issue when showed wrong style scheme on page loading
Your benefit is an more intuitive style flow - Fix an font family issue seen on Twenty Twenty theme
Now fonts from styler overwrite theme fonts in form
1.1.9 — 1.2.5 released 2019.11.15
- Improved german translation by Melanie and Tobias
- Added: border style settings
- Added: label font weight and font style
- Added: Style mode current/live/unstyled dropdown
- Added: link from frontend to styler
Benefit: You open a form click on «Open Styler» and edit the style - Added: CF7 editor added dropdown to choose style
- Added: Added clear, preview button to custom CSS Code
Benefit: Where your create your form you can choose style scheme too. - Moved: some functions to premium
Benefit: You get a CF7 Styler that is supported and working continuously - Moved: some settings together to reduce clicking
- Fixed: Cf7_Quiet_Skin declaration in WP 5.3
- Fixed: Custom CSS-Code area
- Fixed: Scrolling issue

1.1.3 — 1.1.8 released 2019.11.09
- Stunning Background image settings
like Background Color behind picture,
Picture Opacity,
Image Size like cover, contain, repeat vertical, repeat horizontal, repeat both
Image position - Added setting to load styles in body-tag instead of head-tag (Lifetime Premium or WP2LEADS Pro active)
Case: Themes or page builder plugins can stripe out CSS from head-tag and leave your form unstyled.
Benefit:
1) Activate this option per page (directly on page near the form) or globally for all forms to get your styles back
2) Tested Themes and page builder compatibility: Thrive Architect, Optimize Press, Divi Theme, Elementor - Added German translation (Thank you, Melanie and Tobias)
- Improved saving buttons usability, by conditionally grey out some buttons
Benefit: You see intuitively what are your next options - Disable freemius if wp2leads is pro
Case: We sell via freemius and we allow to use the premium version for free for all WP2LEADS Pro license holder
Benefit: freemius will not be shown to you, when you are a WP2LEADS Pro license holder - Show sticky message instead of popup alert
Benefit: You do not have to confirm saving ect. - Removed knowledge base link and added all infos to plugin
- Updated Message with link if CF7 plugin got deactivated on plugins page
1.1.1 — 1.1.2 released 2019.11.06
After a lot of testing we are proud to release our first cf7 styler version on wp.org
- Added knowledge base link message
- stay fullscreen after delete color scheme
- Sanitise values
- Fixed Quiet_Skin error
- added Padding to default style scheme
- uncheck unstyle by default
- fix mobile and tab view height
1.1.0 released 2019.11.04
- Install Contact Form 7 (CF7) if not yet installed, because it is a required plugin.
- Padding for form preview
- uncheck unstyle by default
- fix mobile and tab view height
- Sanitize values
- Changed slug and title
1.0 released 2019.11.01
стилевых форм | Webflow University
Формы отлично подходят для привлечения потенциальных клиентов, сбора отзывов и других ценных бизнес-применений. Узнайте, как использовать формы. Элементы формы также можно стилизовать и располагать уникальными способами.
В этом уроке
Вы можете настроить большинство элементов формы — например, удалить границы поля ввода, изменить цвет фона и т. д. Вы также можете настроить и стилизовать кнопку загрузки файла в различных ее состояниях. Ознакомьтесь с подробным руководством по загрузке файла формы. Однако в этом уроке мы рассмотрим следующее:
- Форма стиля Типография
- Стилирование Форма Статусы
- Стилирование FOCUST HATE Формы Поля
- Использование колонн для быстрого склада элементов формы
. метки, замещающий текст, а также вводимый текст.
Стилизация меток полей
Если вы используете метки полей, вы можете добавить класс к каждой метке. Это позволит вам вносить изменения в стиль, которые применяются к каждой метке поля, имеющей этот класс.
Профессиональный совет: метки полей и заполнители
Метки полей могут быть полезны, чтобы показать назначение элемента формы. Если вы предпочитаете более минимальный подход, вы можете удалить их из формы, выбрав их и нажав «Удалить». Затем добавьте текст-заполнитель для ваших полей.
Стилизация текста-заполнителя
Вы можете изменить стиль текста-заполнителя в меню состояний селектора. Вы можете стилизовать типографику, фон и тени.
Стиль ввода текста
Когда вы добавляете стили типографики в текстовое поле или текстовую область, это влияет на текст, который печатается внутри них. Чтобы стилизовать этот текст, вам нужно сначала добавить образец текста. Выполните следующие действия, чтобы добавить и оформить вводимый текст:
- Создайте новый класс и примените этот класс к каждому текстовому полю в форме.
- Переключение Предварительный просмотр режим
- Введите образец текста в любое текстовое поле.
- Снова переключите режим Preview , чтобы вернуться в конструктор. Образец текста будет виден в поле ввода.
- Выберите текстовое поле
- Перейдите на панель стилей
- Внесите изменения в типографику и посмотрите, как они обновляются на холсте текст или даже добавление других элементов в оболочки ошибок или успехов. Вы можете стилизовать каждый из этих элементов, а также оболочки. Для доступа к сообщениям об успешном завершении и ошибкам:
- Выберите Form Wrapper
- Перейдите на вкладку Elements Settings
- В разделе Form Settings щелкните состояние, которое вы хотите изменить
- Выберите любой появившийся элемент и настройте его по своему вкусу Сообщения об ошибках.
Состояние фокуса поля
Текстовое поле фокусируется, когда вы щелкаете внутри поля или когда вы переходите к нему с помощью клавиши Tab на клавиатуре.
Когда элемент HTML находится в фокусе, многие браузеры добавляют вокруг него сплошную синюю рамку. Вы можете переопределить это значение браузера по умолчанию, настроив состояние Focused любого элемента.
Для доступа к сосредоточенному состоянию:
- Выбор текстового поля
- Перейти к панели стилей
- над полем селектора, C Lick States
- Select Focus от MENU 2
- SELECT FOCE от MENU 2 9001
Внесенные здесь изменения стиля увидят пользователи, щелкнув внутри текстового поля. Вы можете стилизовать сфокусированное состояние так, как вам нравится. Вы можете добавить границы или тени блока и настроить некоторые свойства, чтобы сделать более очевидным для пользователя, что это конкретное поле находится в фокусе.
Вы можете предварительно просмотреть страницу и просмотреть различные текстовые поля, чтобы увидеть, как она будет выглядеть после публикации.Узнайте, как изменить другие состояния любого элемента.
Быстрая компоновка со столбцами
Существует множество способов визуально структурировать форму. Колонки могут быть чрезвычайно полезными. Узнайте больше о столбцах.
Чтобы использовать столбцы для структурирования формы:
- Поместите в форму элемент columns .
- Установите для элемента четыре столбца в настройках столбцов
- Перетащите каждый элемент формы в столбцы
Поля автоматически занимают всю ширину того, что они внутри, поэтому вам не нужно вручную изменять их размер.
По умолчанию ширина кнопок равна ширине их текстового содержимого. Вы можете установить ширину кнопки на 100 % или настройку отображения на «Блокировать», чтобы она охватывала всю ширину столбца, как поля формы.
В представлении планшета все может стать немного сложнее. Чтобы настроить, как ваша строка будет выглядеть на разных устройствах:
- Выберите строку
- Откройте панель настроек элемента
- Настройте параметры для других представлений в параметрах столбца
Попробуйте Webflow — это бесплатно
Был ли этот урок полезен? Дайте нам знать!Спасибо за отзыв! Это поможет нам улучшить наш контент.
Свяжитесь с нашим сообществом
Свяжитесь со службой поддержки
Что-то пошло не так при отправке формы.
Связаться со службой поддержки
Есть предложение по уроку? Дайте нам знать
Спасибо! Ваша заявка принята!
Ой! Что-то пошло не так при отправке формы.
Настройка и стиль формы HubSpot на внешнем сайте
После создания формы в HubSpot вы можете добавить ее на страницы HubSpot или страницы, созданные вами вне HubSpot. Формами можно поделиться на внешнем сайте, не размещенном на HubSpot, одним из следующих способов:
- Внедрение кода формы в существующую страницу.
- Создание отдельной страницы формы, на которую можно ссылаться.
В любом случае изменения, внесенные в форму в инструменте форм HubSpot, будут автоматически отражены в активной форме на вашем внешнем сайте. После добавления формы вы можете стилизовать встроенную форму HubSpot на внешних страницах в редакторе форм или с помощью CSS во внешней таблице стилей.
Если вы работаете с WordPress, узнайте, как вставить форму в запись или на страницу WordPress.
Добавьте код встраивания формы
Маркетинг > Lead Capture > Формы .»}» data-sheets-userformat=»{«2″:8402947,»3″:[null,0],»4»:[null,2,16777215], «14»:[null,2,0],»15″:»Arial»,»16″:10,»26″:400}» data-sheets-formula=»=»»»>Для доступа к форме встроить код:
- Маркетинг > Привлечение лидов > Формы . «}» data-sheets-userformat=»{«2″:8402947,»3″:[null,0],»4″:[null, 2,16777215],»14″:[null,2,0],»15″:»Arial»,»16″:10,»26″:400}» data-sheets-formula=»=»»»> В своей учетной записи HubSpot перейдите к пункту 9.0010 Маркетинг > Привлечение потенциальных клиентов > Формы .
- Наведите указатель мыши на форму и нажмите Действия > Поделиться .
- В диалоговом окне, если вы хотите добавить контакты, отправившие форму, в кампанию Salesforce, щелкните раскрывающееся меню Добавить контакты в кампанию Salesforce и выберите кампанию . Если вы свяжете кампанию Salesforce со своей формой, код внедрения формы будет изменен. В этом случае необходимо повторно добавить код для встраивания на внешний сайт.
- Нажмите Скопируйте .
- Вставьте код для встраивания в модуль HTML на внешней странице. Чтобы отслеживать аналитику для вашей формы, ваш код отслеживания HubSpot должен быть установлен на внешней странице, где вы размещаете форму HubSpot.
Создайте отдельную страницу формы
Вы также можете поделиться своей формой с помощью ссылки «Поделиться» . В ссылке «Поделиться» форма будет отображаться на отдельной странице по собственному URL-адресу. Эту ссылку общего доступа нельзя скрыть или сделать частной. Любой, у кого есть ссылка на общий доступ, сможет получить доступ к форме.
- В своей учетной записи HubSpot перейдите к Marketing > Lead Capture > Forms .
- Наведите указатель мыши на форму и нажмите Действия > Поделиться .
- В диалоговом окне перейдите на вкладку Поделиться ссылкой .
- Щелкните Копировать , чтобы скопировать URL-адрес страницы формы в буфер обмена.
- В браузере откройте новое окно или вкладку и вставьте URL-адрес страницы формы в адресную строку, чтобы загрузить ее. Вы также можете поделиться URL-адресом страницы формы напрямую с другими, чтобы предоставить им доступ к форме.
Стиль встроенной формы в редакторе форм
При оформлении встроенной формы с помощью редактора форм HubSpot вы можете либо использовать тему, либо применить свой собственный стиль.
Обратите внимание: темы и стили, установленные в редакторе форм, будут применяться только к встроенным формам или отдельным страницам форм. Формы на ваших страницах HubSpot могут быть оформлены только с помощью параметров стиля модуля формы в редакторе контента.
Оформление формы с помощью темы
Если вы хотите оформить свои формы без написания специального кода, вы можете применить предустановленные темы к своей встроенной форме или отдельной странице формы. Эти темы добавляют дополнительные параметры настройки к вашим формам в дополнение к любым глобальным настройкам стиля формы.
Чтобы оформить форму в соответствии с темой:
- Маркетинг > Привлечение потенциальных клиентов > Формы . «}» data-sheets-userformat=»{«2″:14337,»3»:{«1″: 0},»14»:{«1″:2,»2″:0},»15″:»Arial»,»16″:10}» data-sheets-formula=»=»»»>В вашем Учетная запись HubSpot, перейдите к Маркетинг > Привлечение потенциальных клиентов > Формы .
- Наведите указатель мыши на форму и нажмите Редактировать .
- В редакторе форм перейдите на вкладку Стиль и предварительный просмотр .
- Если вы редактируете устаревшую форму, на левой панели снимите флажок Сохранить старую тему . Это удалит прежний стиль HubSpot по умолчанию, примененный к этой форме. Любой пользовательский CSS или JavaScript, который вы добавили в форму, больше не будет работать. Этот флажок не применяется к новым формам, созданным в вашей учетной записи.
- Выберите тему .
- В правом верхнем углу нажмите Опубликовать или Обновить .
Используйте пользовательский стиль
Если у вас есть Marketing Hub Starter , Professional, или Enterprise, вы также можете подписаться на встроенные формы уровня HubSpot.
Чтобы применить собственный стиль:
- Маркетинг > Lead Capture > Формы .»}» data-sheets-userformat=»{«2″:14337,»3»:{«1″:0},»14»:{«1″:2,» 2″:0},»15″:»Arial»,»16″:10}» data-sheets-formula=»=»»»>В своей учетной записи HubSpot перейдите к Marketing > Lead Capture > Формы .
- Наведите указатель мыши на форму и нажмите Редактировать .
- В редакторе форм перейдите на вкладку Стиль и предварительный просмотр .
- На левой панели щелкните значок Раздел стиля . Здесь вы можете настроить ширину поля формы, семейство шрифтов, размеры шрифта, цвета шрифта и кнопку формы. Эти стили задаются для отдельных форм и имеют приоритет над глобальными настройками стиля формы.
- После настройки формы в правом верхнем углу нажмите Опубликовать или Обновить .
Стиль встроенной формы с помощью CSS во внешней таблице стилей
Маркетинг > Привлечение потенциальных клиентов > Формы .»}» data-sheets-userformat=»{«2″:14337,»3»:{«1″:0},»14»:{«1″:2,»2″:0},» 15″:»Arial»,»16″:10}» data-sheets-formula=»=»»»>Если у вас есть подписка Marketing Hub или CMS Hub Professional или Enterprise подписка на HubSpot учетной записи, вы можете встроить свою форму как необработанную HTML-форму, а затем стилизовать эту встроенную форму с помощью CSS во внешней таблице стилей.
Маркетинг > Привлечение потенциальных клиентов > Формы .»}» data-sheets-userformat=»{«2″:14337,»3»:{«1″:0},»14»:{«1″ :2,»2″:0},»15″:»Arial»,»16″:10}» data-sheets-formula=»=»»»>Чтобы оформить встроенную форму с помощью CSS:
- Маркетинг > Привлечение потенциальных клиентов > Формы . «}» data-sheets-userformat=»{«2″:14337,»3»:{«1″:0},»14»:{«1 «:2,»2″:0},»15″:»Arial»,»16″:10}» data-sheets-formula=»=»»»>В своей учетной записи HubSpot перейдите к Marketing > Захват потенциальных клиентов > Формы .
- Наведите указатель мыши на форму и нажмите Редактировать .
- В редакторе форм перейдите на вкладку Стиль и предварительный просмотр .
- Нажмите, чтобы переключить Установить как необработанную HTML-форму включить. Форма будет отображаться как необработанный HTML-элемент на вашей внешней странице, а не внутри iframe, и все стили HubSpot по умолчанию, примененные к форме, будут удалены.
- В правом верхнем углу нажмите Опубликовать или Обновить .
- Добавьте код встраивания формы на внешнюю страницу. Если вы уже встроили свою форму, вы должны заменить существующий код для встраивания этой новой версией без стиля.


 Вы можете предварительно просмотреть страницу и просмотреть различные текстовые поля, чтобы увидеть, как она будет выглядеть после публикации.

 «}» data-sheets-userformat=»{«2″:8402947,»3″:[null,0],»4″:[null, 2,16777215],»14″:[null,2,0],»15″:»Arial»,»16″:10,»26″:400}» data-sheets-formula=»=»»»> В своей учетной записи HubSpot перейдите к пункту 9.0010 Маркетинг > Привлечение потенциальных клиентов > Формы .
 Вы также можете поделиться URL-адресом страницы формы напрямую с другими, чтобы предоставить им доступ к форме.
 «}» data-sheets-userformat=»{«2″:14337,»3»:{«1″: 0},»14»:{«1″:2,»2″:0},»15″:»Arial»,»16″:10}» data-sheets-formula=»=»»»>В вашем Учетная запись HubSpot, перейдите к Маркетинг > Привлечение потенциальных клиентов > Формы .
 Эти стили задаются для отдельных форм и имеют приоритет над глобальными настройками стиля формы.
 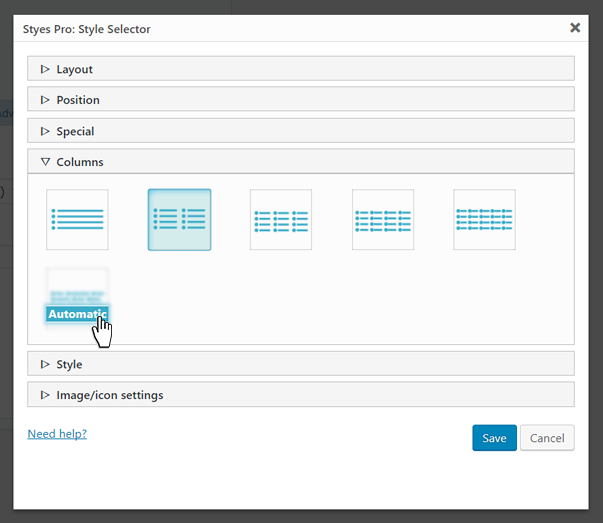 «}» data-sheets-userformat=»{«2″:14337,»3»:{«1″:0},»14»:{«1 «:2,»2″:0},»15″:»Arial»,»16″:10}» data-sheets-formula=»=»»»>В своей учетной записи HubSpot перейдите к Marketing > Захват потенциальных клиентов > Формы .